Today, we’re talking about JUnit, one of the most popular unit test libraries in the JVM ecosystem. The focus of this article is on the features introduced in JUnit 5 that accompany the features in Java 8. Along the way, we'll look at how to create a JUnit Test in JUnit 5, as well as the annotations, methods, assertions, and special test cases. At the end of the article, be sure to grab a copy of our free, one-page JUnit cheat sheet PDF!
Back to topWhat is JUnit?
JUnit is the most known and one of the most used unit test libraries in the JVM world.
JUnit is mature, works well, has the support of all major IDEs, continuous integration projects and build tools. Essentially, it integrates really well with the whole ecosystem, as it’s the defacto unit test library. Now, sometimes you can find yourself googling how to implement a particular function in a test. It’s very typical at this point to copy from some other test and tweak it until it works. This cheat sheet contains the most frequently used annotation and patterns so you needn’t bother copy-pasting!
Back to topCreating a JUnit Test in JUnit 5
Creating a JUnit test is incredibly simple, you need a class in which methods are marked with the @Test annotation that contains JUnit assertions (you can avoid using the assertions, but it's a good practice). That's it, you can create the simplest test like the one below in JUnit syntax:
class JUnit5Test {
    @Test
    void someTest() {
        assertTrue(true);
    }
}
This test has one method which declares a test, and it doesn't do anything more meaningful than to check if a condition true is true.
List of Most-Used JUnit Annotations
However, to use the full power of JUnit, you need to know a couple more annotations. Here's a list of the most used JUnit annotations:
@Test- marks a test method in a class. This method will be treated like a test, it'll get executed by the test engine, get a row in the reporting, and so on.@TestFactory- a method marked with the@TestFactorywill be used to create test cases at runtime. Use it to run the randomized tests or test based on the external data.@DisplayName- makes reports readable with proper test names@BeforeAll/@BeforeEach- lifecycle methods executed prior running tests@AfterAll/@AfterEach- lifecycle methods for cleanup, executed after the tests@Tag- tags a method to separate tests into suites, for example@Tag("fast")can be used to distinguish quick tests from the ones that take longer.@Disabled- makes JUnit skip this test, don't overuse it. In general disabled tests should be deleted and kept just in the VCS history.@Nested- Use on an inner class to control the order of tests.@ExtendWith- Use to enhance the execution: provide mock parameter resolvers and specify conditional execution.
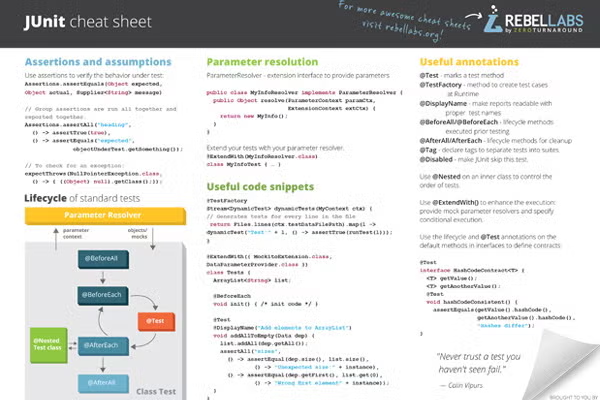
JUnit Lifecycle Methods Example
Good unit tests do the minimal amount of work necessary by just testing the functionality of a small component in the system. However, you cannot always make a component work in the isolation and without prior data processing. You can initialize the data, prepare necessary parameter objects, and initialize any mock objects you need in the lifecycle methods. JUnit provides a simple mechanism to mark the setup methods, and the teardown methods which clean up after the tests have been run.
@BeforeAll
static void beforeAll() { ... }
@BeforeEach
void beforeEach() { ... }
@AfterEach
void afterEach() { ... }
@AfterAll
static void afterAll() { ... }
Methods that prepare the data are supposed to be run before the tests are marked with the @BeforeAll annotation. This means they will be executed before any tests in this class. Methods with the @BeforeEach annotation will be executed before every test in the class. These can perform work that revert changes which the last test has performed, for example.and verify that preconditions are met.
For cleaning up the damage that a test has done to the environment, one can use the @AfterEach annotation on a method which means it will run after every single test in the class. Similarly to @BeforeAll there is the @AfterAll annotation, for method that contain code which can be executed after all the tests in the class have been executed. Now that the lifecycle annotations are extended by the subclasses, you can easily build a nice hierarchy of test classes that have the knowledge about how to initialize, test, and clean up after themselves.
JUnit Nested Tests Example
Another problem that often arises is making sure your test methods are executed in a particular order. For example, let’s say you're testing a stack implementation. It’s important to check your code behaves correctly when the stack is empty, as well as when you add an element.
Of course you can set up different test classes or prepare the objects differently, but a neater method is via the @Nested annotation. The @Nested annotation goes on the inner class and the test methods in that are executed after all the tests in the parent class. The nested class can then have more nested classes in it, so you can effectively chain the classes to achieve the order of tests you want.
JUnit Assertion Example
Assertions have got much better in JUnit 5 too. One of the immediate changes that you'll like is that an error message can be now specified as a Supplier, so it'll be evaluated lazily, if the need arises. This is wonderful, because it means that you can make the error message as complicated and expensive as you want, without making the tests slower.
Another thing that you want to start using is the group assertion feature. A group assertion consists of several individual assertions that are run together and are also reported together. Remember when you wanted to check a couple of invariants on your objects after the tests have run and it was clumsy? Now you can have as many checks as you want, all using the same official JUnit API for the asserts and they don't have to be in the fail-fast mode.
Assertions.assertAll("heading",
  () -> assertTrue(true),
  () -> assertEquals("expected", objectUnderTest.getSomething());
In the snippet above both the assertTrue and assertEquals methods will be evaluated, even if the first one fails.
JUnit Parameter Resolution Example
Parameter resolution is an example of the extension mechanism that JUnit 5 provides. It has many uses, from disabling certain tests to specifying some particular conditions for the tests to run, for example an operating system specific check.
But where it truly shines is providing the context to the tests. ParameterResolver defines the API for dynamically resolving parameters at runtime. If you instrument your class with the @ExtendWith annotation and point it at your custom ParameterResolver class, it will be consulted to provide the objects for the parameters you use in your test methods.
@ExtendWith(MyContextResolver.class)
class MyContextTest {
   @Test
    void testWithParameters(MyContext ctx) {
        assertTrue(true);
    }
}
In the code above, the ctx parameter will be provided by the MyContextResolver class. This is great if you need to maintain some sort of information for your tests. An great example of JUnit's resolver is the TestInfoParameterResolver, which provides the TestInfo objects with the details about the test case: display name, tags, etc.
JUnit Dynamic Test Example
Dynamic tests are perhaps the most revolutionary feature for a user of the older JUnits. Use the @TestFactory annotation to create tests at runtime. You have to annotate a method with the @TestFactory and make it return a collection of DynamicTest classes. It can be an Iterable, or a Stream too, if you prefer.
The DynamicTest class is a part of JUnit, and naturally JUnit knows how to handle it. It requires a name and a body of the test, which you can specify as a lambda. In the body of the test you should use the assert methods, as normal, and they will be executed by the engine and will show up in the reports afterwards.
Why is this useful? Well, you don't always know what all the test cases might be at compile time, so you might want to externalize the test case data, for example, into a file. Then the tests will be run and can pick the data from the file and execute a bunch of tests. You can achieve kinda the same with iterating over the contents and running everything in a single test method, but then you'd fail at the first test failure and won't get the full report.
@TestFactory
Stream dynamicTests(MyContext ctx) {
  // Generates tests for every line in the file
  return Files.lines(ctx.testDataFilePath).map(l -> dynamicTest("Test:" + l, () -> assertTrue(runTest(l)));
The snippet above defines a dynamic test for every line in the file provided by the MyContext parameter. Use this feature sparingly though, more dynamic tests can complicate the code base pretty quickly.
Download the JUnit Cheat Sheet PDF
Ready to grab a copy of our one-page JUnit cheat sheet PDF? Click the button below to download.
Immediately Calculate ROI
Want to see how much time JRebel can save you? Try it free for 14 days with a JRebel trial or see your estimated time and cost savings with our ROI calculator. Just select your parameters and get immediate results.