If somebody asked about the Gradle feature that everybody should know about, I would probably point them towards buildSrc. It is a magic Gradle Java/Groovy project inside your repository, available as a library to all of your build.gradle files.
This approach allows you to write custom logic in Gradle builds, using your favorite JVM language. As a bonus, you can also cover trickier parts of your build logic with unit tests!
In our Gradle buildSrc tutorial today, I'll be talking about how to create a Gradle buildSrc project, create custom tasks and how to turn those buildSrc Gradle tasks into full-blown plugins. As an added bonus, I'll also talk about how to manage dependencies when using Gradle and buildSrc. Let's get started!
Back to topCustom Logic Using Gradle buildSrc
Getting started is easy! Let us create a folder named buildSrc in the root folder of your project (the same folder that contains your settings.gradle):
$ mkdir buildSrc
The project will automatically have both the java and groovy plugins applied to it. We can simply create a standard src/main/java folder and start writing code.
$ mkdir -p buildSrc/src/main/java
Now we can re-sync the project in the IDE and create a new Java class in our freshly minted buildSrc project:
package myapp.gradle;

public class Fun {
  public static void sayHello() {
    System.out.println("Hello from buildSrc!");
  }
}
All that's left to do is to call the Fun.sayHello method from any build.gradle file. Let's create a simple hello task in the root project to try this out:
import myapp.gradle.Fun

task hello {
  doLast {
    Fun.sayHello()
  }
}
$ ./gradlew hello
> Task :hello
Hello from buildSrc!

BUILD SUCCESSFUL in 0s
1 actionable task: 1 executed
That's all there is to it. sayHello is a normal Java method like any other. Since our build.gradle file is like a JVM application, we can call it like any other Java method in Groovy.
Writing Custom Tasks in Gradle buildSrc
Reusing the code is nice, but all this doLast {} boilerplate when creating new tasks feels a bit iffy. With buildSrc we can remove this boilerplate by creating a custom task class instead. A custom Gradle task is simply a Java class that:
- Extends
org.gradle.api.DefaultTask. - Has a public void method with the
@TaskActionannotation. This is the code that will run when our task gets executed.
Let's refactor our previous Fun.sayHello method into such a task:
package myapp.gradle;

import org.gradle.api.DefaultTask;
import org.gradle.api.tasks.TaskAction;

public class HelloTask extends DefaultTask {
    @TaskAction
    public void run() {
        System.out.println("Hello from task " + getPath() + "!");
    }
}
Using a custom task from our Gradle scripts is easy:
import myapp.gradle.HelloTask

task hello(type: HelloTask)
$ ./gradlew hello
> Task :hello
Hello from task :hello!

BUILD SUCCESSFUL in 0s
1 actionable task: 1 executed
Turning Custom Tasks Into Full-Blown Plugins
With a larger project it could happen that you end up defining tens of custom tasks with intricate dependency graphs. In this case it makes sense to create a custom plugin instead. That plugin creates all the tasks and wires them together.
Here's what a simple plugin adding our hello task would look like:
package myapp.gradle;

import org.gradle.api.Plugin;
import org.gradle.api.Project;

public class MyPlugin implements Plugin {
    @Override
    public void apply(Project project) {
        project.getTasks().create("hello", HelloTask.class);
    }
}
And now we can apply the custom plugin in our build file instead of creating a custom task:
apply plugin: myapp.gradle.MyPlugin
Yes, it still works!
$ ./gradlew hello
> Task :hello
Hello from task :hello!

BUILD SUCCESSFUL in 1s
1 actionable task: 1 executed
We now have a working custom Gradle plugin that we can use from any of our subprojects. Of course, printing some text to the terminal is barely scratching the surface of what you can do with Gradle plugins. If you want to know more about writing plugins, I heartily recommend these talks from Gradle Summit 2017:
- Designing and writing Gradle plugins by Benjamin Muschko
- Extending the Gradle Android Plugin by Eyal Lezmy
Managing Dependencies With buildSrc
I used to work as a developer on JRebel for Android. It's a development tool that contains an IDE plugin, a Gradle plugin, an Android app and a normal Java SE app. To build these artifacts, we have a single large Gradle project consisting of 90+ subprojects. These share a lot of common dependencies, for example commons-io or slf4j-api. Writing compile 'org.slf4j:slf4j-api:1.7.25' over and over again quickly became a chore -- as well as a guessing game of what the correct version to use is.
The common way to manage these is to have an ext {} block in your root project. Refer to this Stack Overflow answer for an example. The downside of this approach is that you don't get proper autocompletion or code navigation.
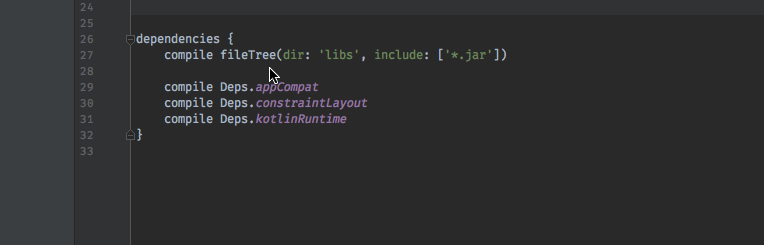
We took a different route: defining our dependencies as plain old String constants in a Deps.java file inside buildSrc. This way we get full code completion and code navigation support right in the IDE! Here's an example of this trick for a really simple Android project:
package myapp.gradle;

public class Deps {
    public static final String androidPlugin = "com.android.tools.build:gradle:3.0.0-beta6";

    public static final String kotlinVersion = "1.1.50";
    public static final String kotlinPlugin = "org.jetbrains.kotlin:kotlin-gradle-plugin:" + kotlinVersion;
    public static final String kotlinRuntime = "org.jetbrains.kotlin:kotlin-stdlib-jre7:" + kotlinVersion;

    public static final String appCompat = "com.android.support:appcompat-v7:26.1.0";
    public static final String constraintLayout = "com.android.support.constraint:constraint-layout:1.0.2";

    public static final String junit = "junit:junit:4.12";
}
And now we can reference these in our build.gradle files:
Get Started With JRebel
JRebel customers save a month of development time annually by eliminating redeploys. See how much time you could save during your free 14-day trial.