IntelliJ IDEA
IntelliJ IDEA
1. Installation
- Open Settings > Plugins
- Select Browse Repositories.
- Search for JRebel and XRebel. Found it? Press Install.
Didn't Work?
- You can also install JRebel for IntelliJ using:
- Download ZIP. The plugin can be downloaded as a ZIP archive from the JetBrains Marketplace:
JRebel and XRebel – IntelliJ IDEs Plugin | Marketplace - Once downloaded, open Plugins in your IDE and press Install plugin from disk.
Browse to the downloaded file and follow the prompts to complete the installation.
Did This Work?
- If the installation was a success, your IDE will restart. After the restart, JRebel will alert you via a notification.
2. Startup
- XRebel for IntelliJ is automatically enabled for all supported application servers.
Good to Know
- To run your application with XRebel,
- Navigate to the Run menu in the menu bar.
- Select the option: Activate rebel agent is JRebel. Specify.
- In the pop-up menu that appears, select Run/Debug with appropriate Agent.
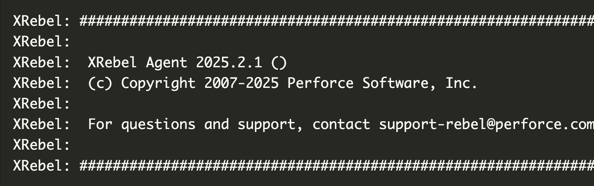
Did this work?
When successful, you will see the XRebel banner in the console right at server startup. This is what the XRebel banner should look like:
3. Activation
- The activation dialog pops up automatically following XRebel launch.
- Fill out the form.
- Press Activate XRebel Trial.
I Have a License
- Already have an XRebel license? Press I have a license to activate using an existing license.
- Activation key: Paste your activation key if you have one already.
- License file (xrebel.lic): Point to your license file. This file was included in the zip file that was downloaded upon completing the trial request form.
- Team URL: Enter your Team URL and email. You get the Team URL from your network administrator.
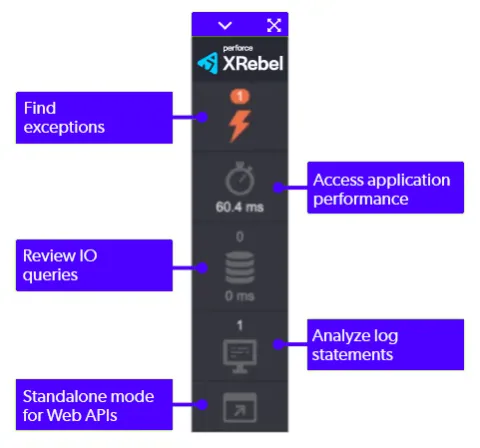
4. XRebel Experience
- Click around in your application.
- Keep an eye on the XRebel toolbar in the lower left corner.
- Press the toolbar buttons to open the relevant views:
Image